MODx Revo, you can configure authorization Login. Basic installation
This article in the most part is a translation of the lesson with the official rtfm, namely the component "Login", but with inserts of a translator. For the best translation don't go, but the point should be clear. However, translation into Russian, I still not found.
This lesson, though called "basic" has many interlocking parts. In this lesson we will discuss what pages you need to create what chunks (snippets) snippets and you want to publish on the pages for full authorization of users.
/ > Numbers in brackets is the ID of resources. It's page_id, your may vary. Here they are chosen simply for convenience.
the
Before you lay out the chunks with snippets, create five pages.
the
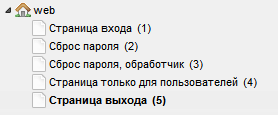
So I have a tree of resources looks like at the moment. Keep in mind that you have a resource ID will be different. In this example, nothing but pages for the component "Login" is not present.
Further, we need to assign the correct rights for users and resources.
the
MODX Revo has a very flexible system of detail right when it comes to user permissions, but in this thread we will do what we want without going deeply into the topic. So, let's proceed.
the 1. Security → Group Resources
Click on the "Create resource group" and call it "Only for users", for example. Click "Save" and all, on this page anymore not changing anything.

the 2. Security → access Control
On the first tab "user Group" click on "New user group". A new group will be called "Users" and click "Save". The user group will have access to resources "Only for users". Why it is us, we learn later in this lesson.
3. On the same page (Security → access Control), click the right mouse button on the created user group and choose "Edit user group".
Next, go to the tab "Access groups of resources," and click on "Add resource group". For proper operation, must be at least the following parameters:
the resource Group: Only for the users (the one we just created)
the Minimum role: Member-9999
the access Policy: Load, List and View
the Context: web
And stored.

the 4. Security → Manage users
Create a "new user" and thus check the access rights for users.
In this case, use a simple username and password, for us, as I already wrote above — it is important to ensure that the new user is in group "Users". To do this, go to the tab "permissions" and click on "Add user to group".
the user Group: Users
Then click "save" at the window, and then again in the right corner of the control panel.

That should ensure that the new user can login with the rights "User" to see the rights page "Only for users".
Now go back to pages in order to add snippets and fragments of code to the relevant pages.
the
the
Place the following code to call snippet on the login page users.
the
Chunk (fragment of code) that displays the login form should also include a link to the page with the "password recovery". Let us consider that we have in the form:
&loginTpl=`lgnLoginTpl` for the login form meets chunk lgnLoginTpl if the user is not authorized
&logoutTpl=`lgnLogoutTpl` — if the user is authorized, he will be issued the contents of the chunk lgnLogoutTpl
&errTpl=`lgnErrTpl` — if you enter the wrong credentials, or the simple word "error" will be displayed chunk lgnErrTpl
&loginResourceId=`4` where to redirect the user after successful authorization. Specify the ID of the resource, in this case 4.
&logoutResourceId=`5` — if the user is logged in, you will be redirected to the page with ID equal to 5.
Also, I note that those chunks are standard, you can create your own chunks for every taste, layout, and implementation. This provides the ability to output form of input/output and so on in any desired form, and moreover, without causing chaos with the code. Standard templates, by the way, can also be changed.
Here is the code that will be given to users who have not logged in in other words "login form". Chunk — a lgnLoginTpl.
the
You can put the link on "Forgot password" (Reset password) inside your template, and reference it by ID. In my case, the ID of the resource with the password recovery — 2.
the
Let's start with the fact that this is the page most often hidden from the menu. It is in most part a form with which users can reset the password. Here I want to explain to you that the page with the reset password (with ID 2 in my case) provides an opportunity to say that the password need to recover, and the reset makes the page "Reset password, handler (3)".
Call the password reset form with the following code:
the
Let us call:
&resetResourceId=`3` page handler (in my case with ID 3), it resets.
&tpl=`lgnForgotPassTpl` is the chunk ID, which has a password reset form.
To understand why the handler is and how it works, I propose to look at the picture:
the
This page should be hidden from all menus. However, even if the link to it will be — it will be simply meaningless.
Its essence is as follows. When a user requests a password reset, his mail the message arrives for this url, and hash. When the user clicks the link from mail, MODx resets the password and redirects the user to a page with the input.
the
the
This is the page confirming that the user is successfully logged in. The content of this page is available only to authorized users.
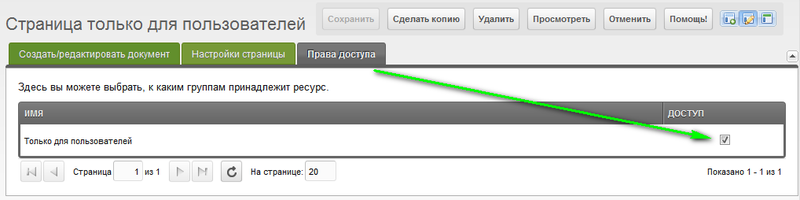
In order for the page to be available only to authorized users, we need to assign to it rights. For this purpose, in the resource tree click on "Page only for users". Then, go to the tab "permissions", there we see the text "Only for users" and to the right of it in column "Access" do not see the check box. Note the check-box and click "save".
the
This is the page to which users are directed upon successful logout. Page should contain only the basic, such as a message with a goodbye, or a link to the login form. For example:
the
the
the
It is not mandatory, but for testing and in General, facilities in the development, you can get a special link to exit. To do this, create a "new link" (web-link) and fill her page with ID 1. For example, call the page with a link like this:
the
You can use this to output like this:
the
the
After we have collected all the pages, bound them, set up access permissions, we need to check it out. If everything works according to our plan, at the entrance we will be forwarded to the page "Only for users". Sign out we can through the login page, as if we are logged in on the login page link will appear on the output. After a successful exit, you should be forwarded to the "exit page".
the
Usually such problems occur if you specify the wrong ID pages, misspelled names, chunks, or of missing brackets. Carefully check the codes.
In addition, it is worth remembering that everything written above snippets should be called uncached. Of course, some may will work in cached form, but most don't. Call to uncached form, you can use an exclamation point, for example it is necessary to write so:
the
But not so:
the
the
One of the reasons, from-for which the way to sign out is that the logout link points to the page where there is no login form. It is worth remembering that the exit button should point to the page with the login form.
The same can be that when resetting a password, email the message does not come. In this case you should configure sending mail on your server.
Questions to ask if you know the answer, will surely help. The next lesson will be translated in your free time. Your comments will be taken into account :)
For registration code sorry — the first time, and how to register is not written anywhere...
Article based on information from habrahabr.ru
This lesson, though called "basic" has many interlocking parts. In this lesson we will discuss what pages you need to create what chunks (snippets) snippets and you want to publish on the pages for full authorization of users.
/ > Numbers in brackets is the ID of resources. It's page_id, your may vary. Here they are chosen simply for convenience.
the
Create page
Before you lay out the chunks with snippets, create five pages.
the
-
the
- login Page (1): the page containing the login form the
- Reset password (2): page where users can request password retrieval the
- Reset of the password, handler (3): a hidden page that will actually reset the password. The users will not see. the
- Page only for users (4): page, the contents of which you can see only authorized users of the site the
- Page yield (5): page to which the user is redirected after a successful logout
So I have a tree of resources looks like at the moment. Keep in mind that you have a resource ID will be different. In this example, nothing but pages for the component "Login" is not present.
Further, we need to assign the correct rights for users and resources.
the
Create the necessary user groups and resource groups
MODX Revo has a very flexible system of detail right when it comes to user permissions, but in this thread we will do what we want without going deeply into the topic. So, let's proceed.
the 1. Security → Group Resources
Click on the "Create resource group" and call it "Only for users", for example. Click "Save" and all, on this page anymore not changing anything.
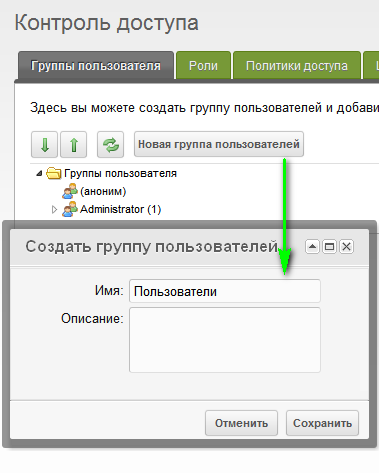
the 2. Security → access Control
On the first tab "user Group" click on "New user group". A new group will be called "Users" and click "Save". The user group will have access to resources "Only for users". Why it is us, we learn later in this lesson.
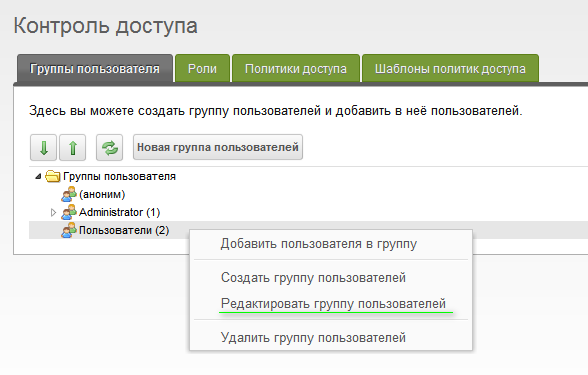
3. On the same page (Security → access Control), click the right mouse button on the created user group and choose "Edit user group".
Next, go to the tab "Access groups of resources," and click on "Add resource group". For proper operation, must be at least the following parameters:
the resource Group: Only for the users (the one we just created)
the Minimum role: Member-9999
the access Policy: Load, List and View
the Context: web
And stored.
the 4. Security → Manage users
Create a "new user" and thus check the access rights for users.
In this case, use a simple username and password, for us, as I already wrote above — it is important to ensure that the new user is in group "Users". To do this, go to the tab "permissions" and click on "Add user to group".
the user Group: Users
Then click "save" at the window, and then again in the right corner of the control panel.
That should ensure that the new user can login with the rights "User" to see the rights page "Only for users".
Now go back to pages in order to add snippets and fragments of code to the relevant pages.
the
Adding snippets to the pages
the
login Page (1)
Place the following code to call snippet on the login page users.
the
[[!Login? &loginTpl=`lgnLoginTpl` &logoutTpl=`lgnLogoutTpl` &errTpl=`lgnErrTpl` &loginResourceId=`4` &logoutResourceId=`5`]] Chunk (fragment of code) that displays the login form should also include a link to the page with the "password recovery". Let us consider that we have in the form:
&loginTpl=`lgnLoginTpl` for the login form meets chunk lgnLoginTpl if the user is not authorized
&logoutTpl=`lgnLogoutTpl` — if the user is authorized, he will be issued the contents of the chunk lgnLogoutTpl
&errTpl=`lgnErrTpl` — if you enter the wrong credentials, or the simple word "error" will be displayed chunk lgnErrTpl
&loginResourceId=`4` where to redirect the user after successful authorization. Specify the ID of the resource, in this case 4.
&logoutResourceId=`5` — if the user is logged in, you will be redirected to the page with ID equal to 5.
Also, I note that those chunks are standard, you can create your own chunks for every taste, layout, and implementation. This provides the ability to output form of input/output and so on in any desired form, and moreover, without causing chaos with the code. Standard templates, by the way, can also be changed.
Here is the code that will be given to users who have not logged in in other words "login form". Chunk — a lgnLoginTpl.
the
<div class="loginForm">
<div class="loginMessage" > [[+errors]]</div>
<div class="loginLogin">
<form class="loginLoginForm" action="[[~[[*id]]]]" method="post">
<fieldset class="loginLoginFieldset">
<legend class="loginLegend">[[+actionMsg]]</legend>
<label class="loginUsernameLabel">[[%login.username]]
<input class="loginUsername" type="text" name="username" />
</label>

<label class="loginPasswordLabel">[[%login.password]]
<input class="loginPassword" type="password" name="password" />
</label>
<input class="returnUrl" type="hidden" name="returnUrl" value="[[+request_uri]]" />

[[+login.recaptcha_html]]

<input class="loginLoginValue" type="hidden" name="service" value="login" />
<span class="loginLoginButton"><input type="submit" name="Login" value="[[+actionMsg]]" /></span>
</fieldset>
</form>
</div>
</div>

<a href="[[~2]]">Forgot password?</a>
You can put the link on "Forgot password" (Reset password) inside your template, and reference it by ID. In my case, the ID of the resource with the password recovery — 2.
the
password Reset (2)
Let's start with the fact that this is the page most often hidden from the menu. It is in most part a form with which users can reset the password. Here I want to explain to you that the page with the reset password (with ID 2 in my case) provides an opportunity to say that the password need to recover, and the reset makes the page "Reset password, handler (3)".
Call the password reset form with the following code:
the
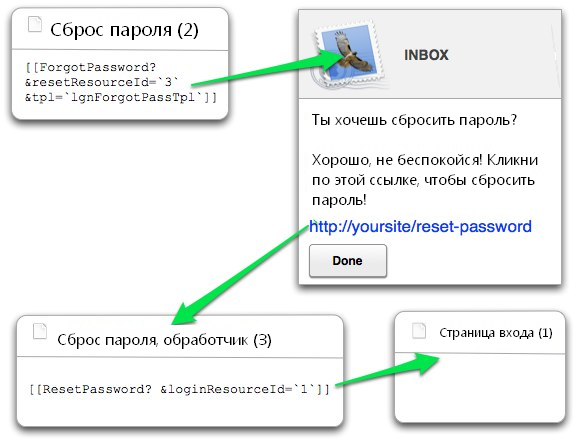
[[!ForgotPassword? &resetResourceId=`3` &tpl=`lgnForgotPassTpl`]]Let us call:
&resetResourceId=`3` page handler (in my case with ID 3), it resets.
&tpl=`lgnForgotPassTpl` is the chunk ID, which has a password reset form.
To understand why the handler is and how it works, I propose to look at the picture:
the
Reset password, handler (3)
This page should be hidden from all menus. However, even if the link to it will be — it will be simply meaningless.
Its essence is as follows. When a user requests a password reset, his mail the message arrives for this url, and hash. When the user clicks the link from mail, MODx resets the password and redirects the user to a page with the input.
the
[[!ResetPassword? &loginResourceId=`1`]]the
Page only for users (4)
This is the page confirming that the user is successfully logged in. The content of this page is available only to authorized users.
In order for the page to be available only to authorized users, we need to assign to it rights. For this purpose, in the resource tree click on "Page only for users". Then, go to the tab "permissions", there we see the text "Only for users" and to the right of it in column "Access" do not see the check box. Note the check-box and click "save".
the
Page yield (5)
This is the page to which users are directed upon successful logout. Page should contain only the basic, such as a message with a goodbye, or a link to the login form. For example:
the
<p>Thanks for visiting! Come back soon!</p>the
Details
the
Page yield (5)
It is not mandatory, but for testing and in General, facilities in the development, you can get a special link to exit. To do this, create a "new link" (web-link) and fill her page with ID 1. For example, call the page with a link like this:
the
[[~1? &service=`logout`]]You can use this to output like this:
the
<a href="[[~1? &service=`logout`]]" title="Logout">Exit</a>the
Possible errors
After we have collected all the pages, bound them, set up access permissions, we need to check it out. If everything works according to our plan, at the entrance we will be forwarded to the page "Only for users". Sign out we can through the login page, as if we are logged in on the login page link will appear on the output. After a successful exit, you should be forwarded to the "exit page".
the
I can't get in!
Usually such problems occur if you specify the wrong ID pages, misspelled names, chunks, or of missing brackets. Carefully check the codes.
In addition, it is worth remembering that everything written above snippets should be called uncached. Of course, some may will work in cached form, but most don't. Call to uncached form, you can use an exclamation point, for example it is necessary to write so:
the
[[!Login]]But not so:
the
[[Login]]the
I can't log out!
One of the reasons, from-for which the way to sign out is that the logout link points to the page where there is no login form. It is worth remembering that the exit button should point to the page with the login form.
The same can be that when resetting a password, email the message does not come. In this case you should configure sending mail on your server.
Questions to ask if you know the answer, will surely help. The next lesson will be translated in your free time. Your comments will be taken into account :)
For registration code sorry — the first time, and how to register is not written anywhere...


Комментарии
Отправить комментарий