Connect the GPS receiver to the laptop and create a GPS tracker
Many travel lovers have long been the use of GPS-devices in the conduct of its activities.
Someone is using the navigators to move from one place to another by the nearest road/road, using, as a rule, the navigation software with vector maps. Some prefer more extreme activities, getting from point A to point B on the nearest way to the SUV. For the latest vector map is not so important, the main thing here is to know the topography of the immediate area, and used navigation software with raster maps, tied to the coordinates.
I set a goal to connect an external GPS receiver to a laptop on which you can install different programs to work with vector and raster maps to obtain a convenient tool for planning a route and view your current location. At the same time wanted to transfer GPS data to a server, so my location can be tracked remotely (improvised GPS tracker).
So, if You are interested in this topic, welcome to the topic.
have:
the
The laptop needs to be installed a certain software:
On the PDA must be installed additional applications:
1) GPSGate.
First, will achieve the transmission of the GPS signal from the external device to the notebook.
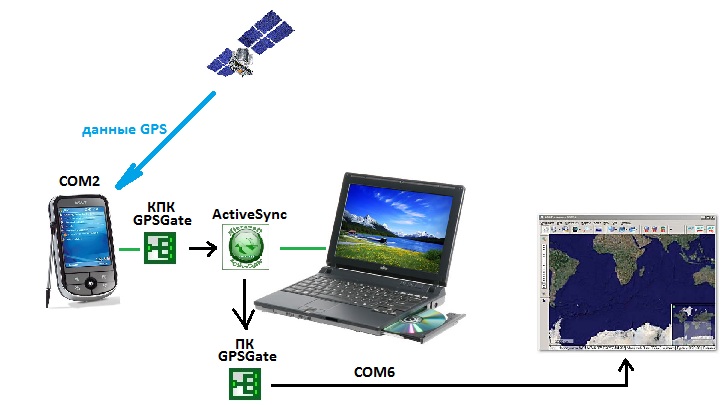
Here the scheme is simple:
Now let's move from theory to practice.
setup GSP receiver
We assume that the program GPSGate is already installed on our PDA.
Produced by the program setting:
If the procedures for receiving and transmission of the coordinates are successfully, the icon on the panel lights up in green. If the device is ready, but the coordinates have not yet been received (the satellites are not caught) — the tab for the program is lit in yellow.
Now we have achieved the transmission of the GPS signal from the PDA to the laptop.
Here you can duplicate the transmission of the GPS signal to the server GPSGate to monitor Your position (requires pre-registration on the website).
This requires the tab "Output" add "gpsgate.com (Send)" and the connection settings to the server to specify Your username/password on gpsgate.com. Data transfer from the handheld to the server will be performed by means of cellular communication. If You have 3g modem, you can make similar settings in the program

Go to configuring notebook
It is assumed here that already installed: ActiveSync, GPSGate and SASPlanet (or Google Earth).
On this basic setup programs ended.
SASPlanet is a large number of cards (Yandex, Navitel, Google and etc)
In the customizations in Source it is better to specify "Internet + Cache", then viewed maps will be loaded from the Cache (memory laptop), and the new from the Internet.
So it will be more logical to save traffic, in advance to view as much as possible the area that you intend to visit in your trip.
What?
We get the GPS signal to an external device and transfer it to the laptop where the GPS data is processed and we get our current location is bound to a raster or vector map in the program SASPlanet (any other equivalent).
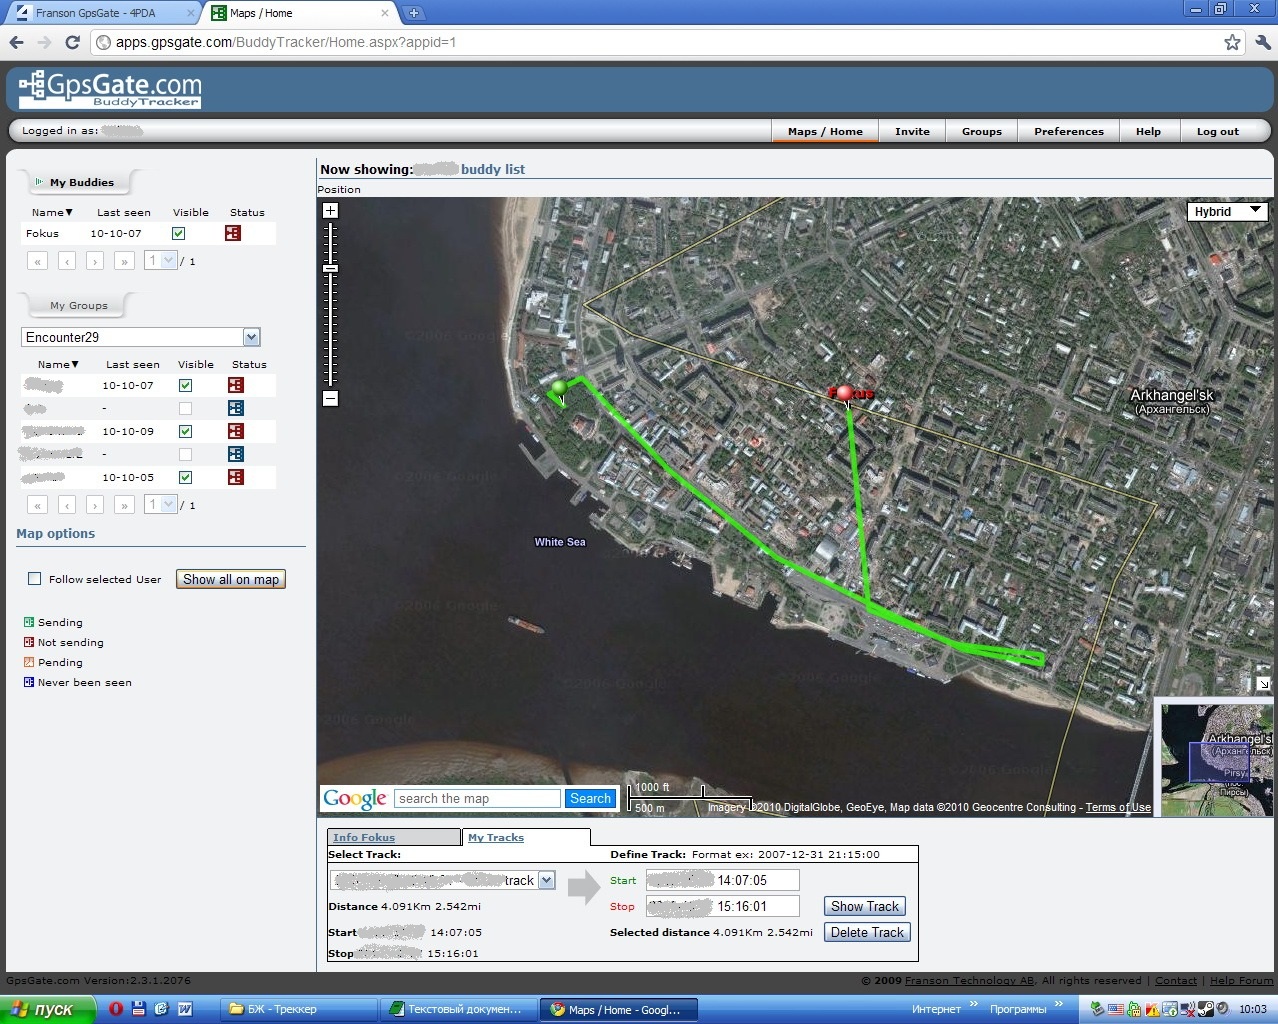
In parallel, data about the movement and current location are sent to the server. Thus you can remotely view our location and a route for a specified period of time.
why?
I use this during team active urban games:
1) the Headquarters remotely monitors and coordinates simultaneously move all of the crews.
2) the Navigation software on laptop have more functionality and clarity than portable GPS devices. You can quickly plan and coordinate your itinerary, choose from many maps with the most suitable.
Many travelers on the road connect your gps device with more compact netbooks and use OziExplorer with raster topographic maps, have usually more informative about the terrain.
Fans of the classic tourism also will be interesting to observe the movement on a large interactive map, where you can see nearby attractions displayed on Google maps.
During the trip, you can share your location with family and friends, who will be able to trace your route.
Article based on information from habrahabr.ru
Someone is using the navigators to move from one place to another by the nearest road/road, using, as a rule, the navigation software with vector maps. Some prefer more extreme activities, getting from point A to point B on the nearest way to the SUV. For the latest vector map is not so important, the main thing here is to know the topography of the immediate area, and used navigation software with raster maps, tied to the coordinates.
I set a goal to connect an external GPS receiver to a laptop on which you can install different programs to work with vector and raster maps to obtain a convenient tool for planning a route and view your current location. At the same time wanted to transfer GPS data to a server, so my location can be tracked remotely (improvised GPS tracker).
So, if You are interested in this topic, welcome to the topic.
have:
the
-
the
- GPS Communicator the
- Laptop
3g-modem (can be deleted)
The laptop needs to be installed a certain software:
-
the
- To sync PDA with PC (in my case ActiveSync for Windows XP or "Windows Mobile device Center" for Windows 7, Vista); the
- of the Navigation software. For example, OziExplorer (for raster maps), SASPlanet; the
- Program for processing the GPS signal from the receiver.
On the PDA must be installed additional applications:
1) GPSGate.
First, will achieve the transmission of the GPS signal from the external device to the notebook.
Here the scheme is simple:
-
the
- the GPS signal is received on the PDA via a hardware port COM2 (in my case); the
- PDA synchronized with a laptop using ActiveSync; the
- with app installed GPSGate on the PDA the GPS signal is redirected to the COM2 port ActiveSync; the
- the Program GPSGate installed on the laptop receives the signal from the ActiveSync port and redirect it to a virtual COM port (in my case COM6); the
- In the navigation software installed on the laptop referred to as a GPS source signal with the virtual port created in GPSGate.
Now let's move from theory to practice.
setup GSP receiver
We assume that the program GPSGate is already installed on our PDA.
Produced by the program setting:
-
the
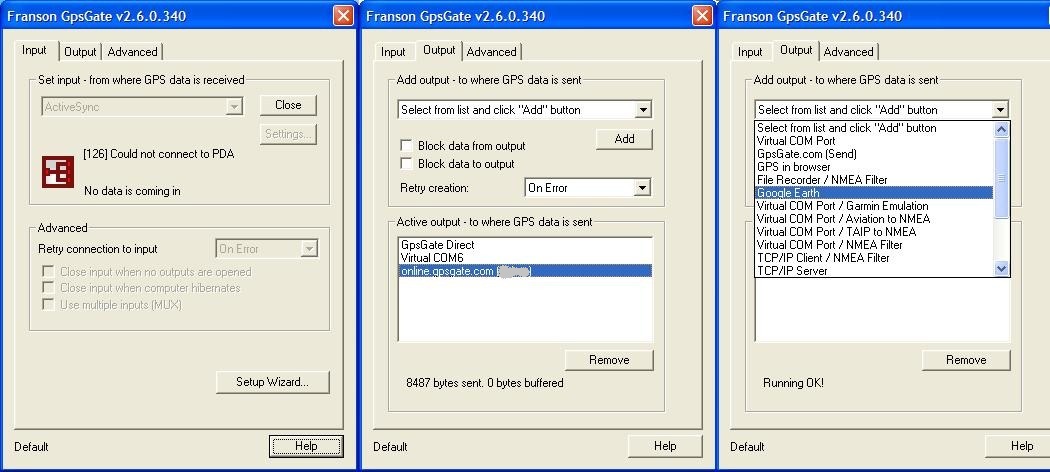
- In the tab "Input" specify hardware port of Your GPS receiver. On a PDA is typically COM2. You can Refine by going to Control panel — External GPS — Hardware. the
- In the tab "Output" identifies the recipients of the GPS signal.
Here from the drop-down list, select "ActiveSync" to the received GPS-signal is routed to the connection port of the handheld computer and notebook.
the - you can Now select menu "Online". The icons should be green (enabled), which means that at the moment there is a connection with the satellites.
If the procedures for receiving and transmission of the coordinates are successfully, the icon on the panel lights up in green. If the device is ready, but the coordinates have not yet been received (the satellites are not caught) — the tab for the program is lit in yellow.
Now we have achieved the transmission of the GPS signal from the PDA to the laptop.
Here you can duplicate the transmission of the GPS signal to the server GPSGate to monitor Your position (requires pre-registration on the website).
This requires the tab "Output" add "gpsgate.com (Send)" and the connection settings to the server to specify Your username/password on gpsgate.com. Data transfer from the handheld to the server will be performed by means of cellular communication. If You have 3g modem, you can make similar settings in the program
Go to configuring notebook
It is assumed here that already installed: ActiveSync, GPSGate and SASPlanet (or Google Earth).
-
the
- In the settings of GPSGate, select "Input" ActiveSync (since the source of the GPS signal we have will be ActiveSync); the
- The "Output"select Virtual COM Port (Receiver of the GPS signal will be the virtual port, for example, COM-6); the
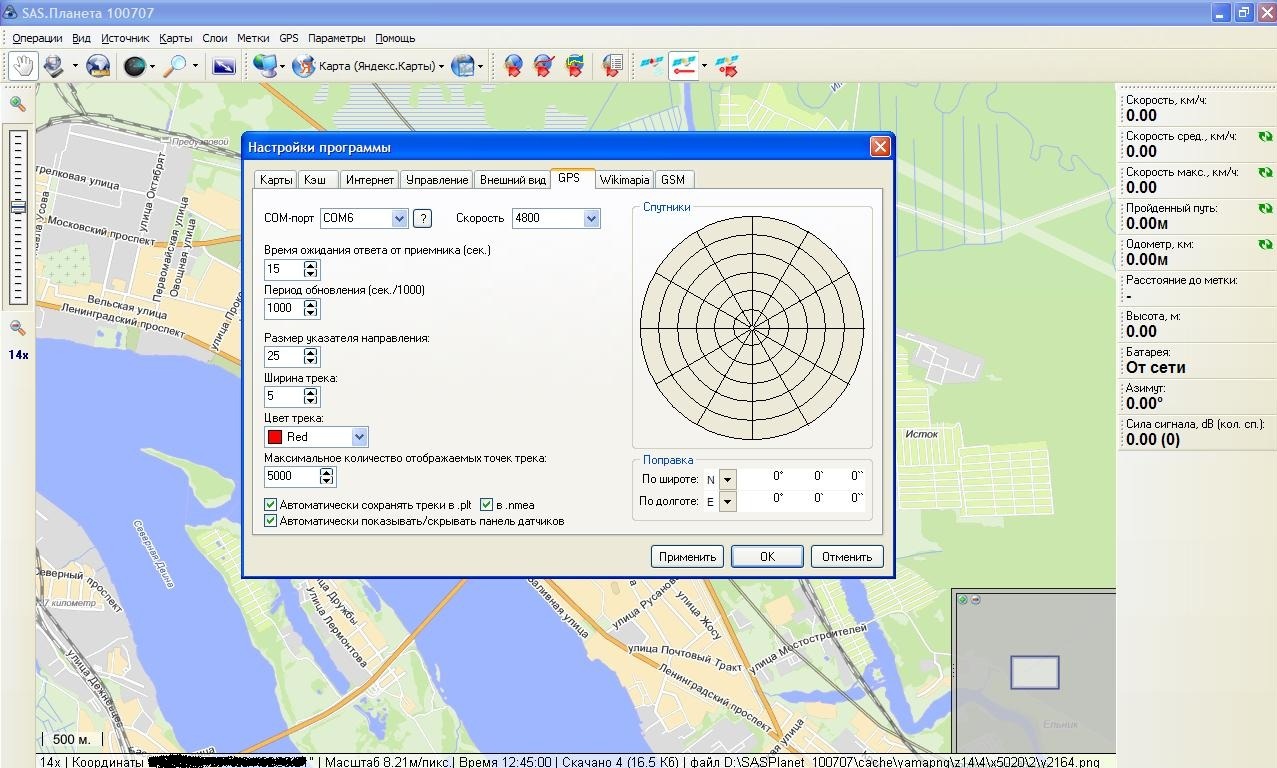
- In the settings SASPlanet: Options — settings — GPS
In the com port specified our Virtual COM-Port CATFISH-6.
On this basic setup programs ended.
SASPlanet is a large number of cards (Yandex, Navitel, Google and etc)
In the customizations in Source it is better to specify "Internet + Cache", then viewed maps will be loaded from the Cache (memory laptop), and the new from the Internet.
So it will be more logical to save traffic, in advance to view as much as possible the area that you intend to visit in your trip.
What?
We get the GPS signal to an external device and transfer it to the laptop where the GPS data is processed and we get our current location is bound to a raster or vector map in the program SASPlanet (any other equivalent).
In parallel, data about the movement and current location are sent to the server. Thus you can remotely view our location and a route for a specified period of time.
why?
I use this during team active urban games:
1) the Headquarters remotely monitors and coordinates simultaneously move all of the crews.
2) the Navigation software on laptop have more functionality and clarity than portable GPS devices. You can quickly plan and coordinate your itinerary, choose from many maps with the most suitable.
Many travelers on the road connect your gps device with more compact netbooks and use OziExplorer with raster topographic maps, have usually more informative about the terrain.
Fans of the classic tourism also will be interesting to observe the movement on a large interactive map, where you can see nearby attractions displayed on Google maps.
During the trip, you can share your location with family and friends, who will be able to trace your route.


Комментарии
Отправить комментарий