Setup JavaCV in Windows 7
the user manual is also applicable for 2.4+ versions of OpenCV and JavaCV
I searched libraries for image processing in Java. I recommend JavaCV.
JavaCV provides wrappers for OpenCV, so you can directly use OpenCV functions in Java.
Let's define a few steps that you should perform to install JavaCV in Windows 7.

the
the Installed Java Development Kit (JDK) here. Please note CPU architecture (x32/x64).
the
Install Redistributable Microsoft Visual C++:
Microsoft Visual C++ 2010 Redistributable Package (x86)
Microsoft Visual C++ 2010 Redistributable Package (x64)
the
Pass the link, select the version of OpenCV and downloadable *-super-pack.exe. Here we will download a self-extracting archive after the finish unpack it wherever you want.
the
We now have a step of adding the OpenCV .dll to path to JavaCV knew where to look.
Go to the Control Panel (control Panel) > System () > Advanced System Settings (advanced system settings) > Environment Variables (environment Variables) — I have Windows in English, so my translation may be a little different, but the meaning remains the same. In System variable (System variables) select path and click Edit (Edit). Now add to the end of the line after the sign ";" the address of the location of OpenCV .dll. Just unpack the downloaded archive at: D:\opencv and show by example. If you have unpacked otherwise, insert your location:
For OpenCV 2.4.2 and earlier:
x32
D:\opencv\build\x86\vc10\bin; D:\opencv\build\common\tbb\ia32\vc10\
x64:
D:\opencv\build\x64\vc10\bin; D:\opencv\build\common\tbb\intel64\vc10\
For OpenCV 2.4.3 and later:
x32
D:\opencv\build\x86\vc10\bin
x64:
D:\opencv\build\x64\vc10\bin
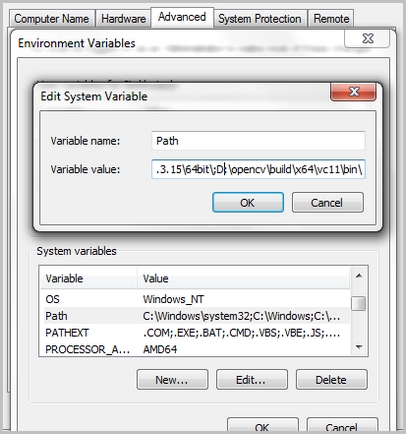
And after this restart your computer!
the
Downloaded JavaCV-bin here and unpacking.
NOTE: versions of JavaCV and OpenCV should be compatible! Valid version of OpenCV and other requirements can be found in the Readme file in the folder with JavaCV!

the
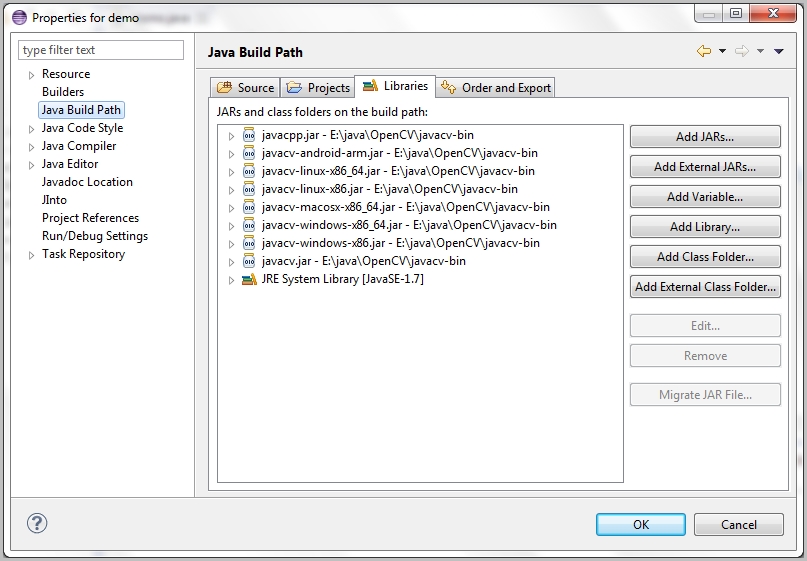
Now you can create a Java project 'demo' in Eclipse.
Further seguem вProject > Properties > Java Build Path > Libraries > Add External JARs, then in your JavaCV folder and add all jar files.
the
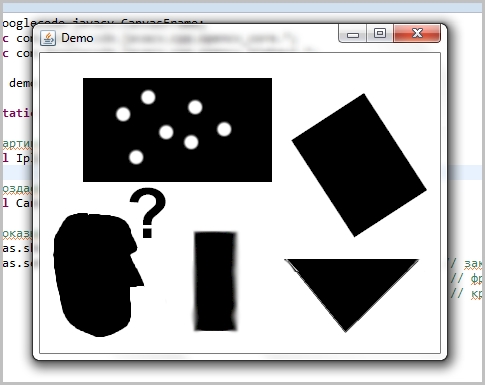
Now create demo.java in the src folder of our project.
Insert the following code:
the
the
measurement...
Thank you.
Article based on information from habrahabr.ru
I searched libraries for image processing in Java. I recommend JavaCV.
JavaCV provides wrappers for OpenCV, so you can directly use OpenCV functions in Java.
Let's define a few steps that you should perform to install JavaCV in Windows 7.
the
Step 1
the Installed Java Development Kit (JDK) here. Please note CPU architecture (x32/x64).
the
Step 2
Install Redistributable Microsoft Visual C++:
Microsoft Visual C++ 2010 Redistributable Package (x86)
Microsoft Visual C++ 2010 Redistributable Package (x64)
the
Step 3
Pass the link, select the version of OpenCV and downloadable *-super-pack.exe. Here we will download a self-extracting archive after the finish unpack it wherever you want.
the
Step 4
We now have a step of adding the OpenCV .dll to path to JavaCV knew where to look.
Go to the Control Panel (control Panel) > System () > Advanced System Settings (advanced system settings) > Environment Variables (environment Variables) — I have Windows in English, so my translation may be a little different, but the meaning remains the same. In System variable (System variables) select path and click Edit (Edit). Now add to the end of the line after the sign ";" the address of the location of OpenCV .dll. Just unpack the downloaded archive at: D:\opencv and show by example. If you have unpacked otherwise, insert your location:
For OpenCV 2.4.2 and earlier:
x32
D:\opencv\build\x86\vc10\bin; D:\opencv\build\common\tbb\ia32\vc10\
x64:
D:\opencv\build\x64\vc10\bin; D:\opencv\build\common\tbb\intel64\vc10\
For OpenCV 2.4.3 and later:
x32
D:\opencv\build\x86\vc10\bin
x64:
D:\opencv\build\x64\vc10\bin
And after this restart your computer!
the
Step 5
Downloaded JavaCV-bin here and unpacking.
NOTE: versions of JavaCV and OpenCV should be compatible! Valid version of OpenCV and other requirements can be found in the Readme file in the folder with JavaCV!
the
Step 6
Now you can create a Java project 'demo' in Eclipse.
Further seguem вProject > Properties > Java Build Path > Libraries > Add External JARs, then in your JavaCV folder and add all jar files.
the
Step 7
Now create demo.java in the src folder of our project.
Insert the following code:
the
import static com.googlecode.javacv.cpp.opencv_highgui.cvLoadImage;

import java.io.File;

import javax.swing.JFileChooser;

import com.googlecode.javacv.CanvasFrame;
import com.googlecode.javacv.cpp.opencv_core.IplImage;

public class demo {

public static void main(String[] args) {

String path = null; // file path
JFileChooser fileChooser = new JFileChooser();

/* the file selection window */
int ret = fileChooser.showDialog(null, "Open file");
if (ret == JFileChooser.APPROVE_OPTION) {

/* get file path */
path = fileChooser.getSelectedFile().getPath();
}

/* open the image */
final IplImage image = cvLoadImage(path);

/* create frame */
final CanvasFrame canvas = new CanvasFrame("Demo");

/* show the picture in our frame */
canvas.showImage(image);
canvas.setDefaultCloseOperation(javax.swing.JFrame.EXIT_ON_CLOSE); // close
// frame
// crestcom!
}
}
the
Step 8
measurement...
Thank you.


Комментарии
Отправить комментарий